断断续续学 Aegisub 和特效,一直想要弄懂的就是 kara-templater。文档的介绍部分看的头疼,还是得结合源码来看。这东西就相当于是笔记一样的存在吧(
这里提一句,Aegisub 的 Lua 版本是 Lua 5.1。
ToC
- 入口
- macro_can_template
- macro_apply_templates
- filter_apply_templates
- karaskel.collect_head
- parse_templates
- apply_templates
- 结语
入口
首先是入口,最后两行标记了入口函数:
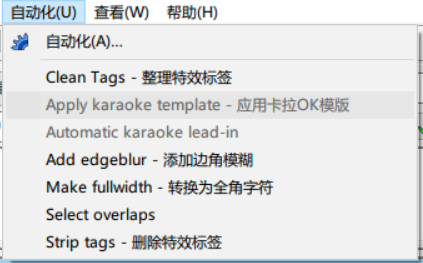
aegisub.register_macro(tr"Apply karaoke template", tr"Applies karaoke effects from templates", macro_apply_templates, macro_can_template)aegisub.register_filter(tr"Karaoke template", tr"Apply karaoke effect templates to the subtitles.\n\nSee the help file for information on how to use this.", 2000, filter_apply_templates)这里的 tr 是调用了本地化的函数,我们暂且跳过;对于第一行,其功能对应的是自动化列表中的应用卡拉OK模板,因此有两个函数对应:前者对应实际的操作,后者对应能否应用操作。比如下图中,后者的返回就是 false :
对于这一行,详细的类 TypeScript 声明如下:
type ProcessFunction = (subtitle: Subtitle, selected: lines[], active: number) => void;declare function aegisub.register_macro( name: string, desc: string, processing: ProcessFunction, validation: ProcessFunction, is_active: ProcessFunction)文中未给出定义的 Subtitle 对象的定义参见 Wiki。
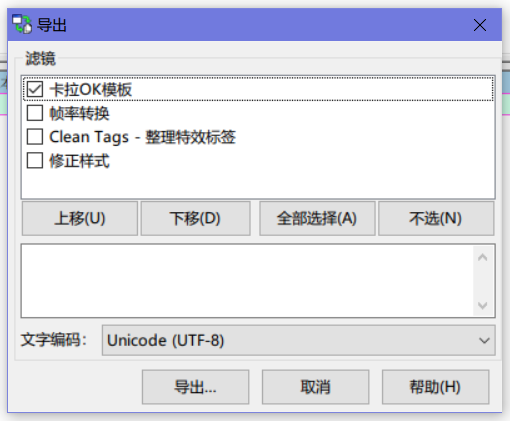
而第二行,其对应的是导出时的选项。其参数从左到右分别为名称,简介,优先级和实际操作。
对应的声明如下:
type ConfigPanelFunction = (subtitles: Subtitle, old_settings: Table<Setting>) => Table<Dialog>;declare function aegisub.register_filter( name: string, description: string, priority: number, processing: ProcessFunction, configuration_panel_provider);通过之后的阅读我们会知道,应用卡拉OK模板包含了导出中的功能因此我们只需要分析应用卡拉OK模板对应的函数就足够了。
macro_can_template
先从能否应用卡拉 OK 模板的 macro_can_template 函数开始吧:
function macro_can_template(subs) -- 检测文件中是否有模板,当不存在模板时不允许宏运行 local num_dia = 0 for i = 1, #subs do local l = subs[i] if l.class == "dialogue" then num_dia = num_dia + 1 -- 检测该行是否为 template 行 if (string.headtail(l.effect)):lower() == "template" then return true end -- 不尝试匹配所有行以减短执行时间 if num_dia > 50 then return false end end end return falseend检测函数对字幕的各行进行循环,并尝试寻找以 template 作为特效栏第一个单词的行。当这样的行存在时,直接返回 true,表示可以应用。
这里值得注意的是,函数的执行限定了 dialogue 的前 50 行。这也是推荐将 template 放在整个字幕文件开头的原因。
macro_apply_templates
照例从入口开始:
function macro_apply_templates(subs, sel) filter_apply_templates(subs, {ismacro=true, sel=sel}) aegisub.set_undo_point("apply karaoke template")end这个函数调用了 filter_apply_templates,这也就是上文中包含的来源。和 filter_apply_templates 相比,其只多了一个撤回以便应用内操作——导出是不需要撤回的。
这里有个问题:
filter_apply_templates函数的第二个参数和上文定义中不一致。不知道这是不是属于bug,但由于实际的函数操作中并没有用到第二个参数,因此估计这是一个历史遗留问题。
filter_apply_templates
既然本体是这个,拿我们就直接来看好了。
-- 模板的主函数function filter_apply_templates(subs, config) aegisub.progress.task("Collecting header data...") local meta, styles = karaskel.collect_head(subs, true)
aegisub.progress.task("Parsing templates...") local templates = parse_templates(meta, styles, subs)
aegisub.progress.task("Applying templates...") apply_templates(meta, styles, subs, templates)end可以看出有三个步骤:收集头部信息、解析模板、应用模板。
karaskel.collect_head
本来这部分我想单独拉出一篇来看 karaskel,但后来想想还是算了。我们先进入 collect_head 函数:
初始化
-- 从字幕文件中收集样式和 metadatafunction karaskel.collect_head(subs, generate_furigana) local meta = { -- X and Y script resolution res_x = 0, res_y = 0, -- 对视频和脚本分辨率不一致的修正因子 video_x_correct_factor = 1.0 } local styles = { n = 0 } local toinsert = {} local first_style_line = nil
if not karaskel.furigana_scale then karaskel.furigana_scale = 0.5 end到这里为止的部分都是初始化。可以看到,要返回的 meta 中有 x,y 分辨率和视频缩放因子 video_x_corrent_factor。下面这个 toinsert 看上去诡异,其实是 to_insert 没加下划线的锅。最后,其初始化了注音缩放因子为 0.5 。
步骤 1 - 收集样式与信息
-- First pass: collect all existing styles and get resolution info for i = 1, #subs do if aegisub.progress.is_cancelled() then error("User cancelled") end local l = subs[i]
if l.class == "style" then if not first_style_line then first_style_line = i end -- Store styles into the style table styles.n = styles.n + 1 styles[styles.n] = l styles[l.name] = l l.margin_v = l.margin_t -- convenience
-- And also generate furigana styles if wanted if generate_furigana and not l.name:match("furigana") then aegisub.debug.out(5, "Creating furigana style for style: " .. l.name .. "\n") local fs = table.copy(l) fs.fontsize = l.fontsize * karaskel.furigana_scale fs.outline = l.outline * karaskel.furigana_scale fs.shadow = l.shadow * karaskel.furigana_scale fs.name = l.name .. "-furigana"
table.insert(toinsert, fs) -- queue to insert in file end
elseif l.class == "info" then -- Also look for script resolution local k = l.key:lower() meta[k] = l.value end end接下来的步骤是收集所有的样式和 metadata。针对耗时较长的过程,我们需要允许用户随时打断操作,因此要提供随时可以中止的能力。在遍历过程中,这个步骤只对 style 行和 info 行操作。
值得注意的是,info 行是 Aegisub 对 [Script Info] 的封装。其拥有 key 和 value 两个成员。
对于 style 行,其将样式存储在 styles 中(可通过索引和名称访问),并将 styles 中表示存储行数的变量(styles.n)自增。并且在这一步,增加了 margin_v 这以参数,对应 margin_t,方便之后的操作。
这一步中还存储了首行样式对应的行号以供下一步处理。(虽然我没看出具体用途)
同时,这一步还处理了注音样式。注音样式的判断依据是样式的名称中含有 furigana。对于所有非注音样式,都将生成一份副本。 副本的名称是 原名-furigana ,对应的字体,边框和阴影都被乘以了注音缩放因子。最后,其被加入 to_insert 中。
而对于 info 行,我们将其全部存入 meta 中。为了访问方便,我们将键值对中的键全部转为其小写形式。
步骤 2 - 加入新样式
-- Second pass: insert all toinsert styles that don't already exist for i = 1, #toinsert do if not styles[toinsert[i].name] then -- 加入样式表 styles.n = styles.n + 1 styles[styles.n] = toinsert[i] styles[toinsert[i].name] = toinsert[i] -- 加入字幕文件 subs[-first_style_line] = toinsert[i] end end这里的新样式就是之前生成的注音样式了。由于其全部存储在 to_insert 中,这一步的目的就是将其加入到 styles 里。当然了,前提是 styles 里不存在同名的样式。
行 9 意味不明,如果有知道的大佬欢迎在评论区指出。
步骤 3 - 修复分辨率
-- 修复分辨率 if meta.playresx then meta.res_x = math.floor(meta.playresx) end if meta.playresy then meta.res_y = math.floor(meta.playresy) end if meta.res_x == 0 and meta_res_y == 0 then meta.res_x = 384 meta.res_y = 288 elseif meta.res_x == 0 then -- This is braindead, but it's how TextSub does things... if meta.res_y == 1024 then meta.res_x = 1280 else meta.res_x = meta.res_y / 3 * 4 end elseif meta.res_y == 0 then -- As if 1280x960 didn't exist if meta.res_x == 1280 then meta.res_y = 1024 else meta.res_y = meta.res_x * 3 / 4 end end这里负责处理的就是分辨率方面的问题了。首先,通过向下取整,其将分辨率归约为整数;然后处理分辨率为 0 的不同情况。当 x、y 同时为 0 时,其将分辨率定为 384*288;当只有 x 为 0 时,其根据 y 进行判断:当 y 为 1280 时,分辨率为 1024*1280(这一步是模拟 TextSub 的操作),否则就设置为 4:3 的对应分辨率;当只有 y 为 0 时,同样要么是 1280*1024,要么是 4:3。
在字幕制作过程中,不应该出现任何未指定分辨率的情况。
步骤 4 - 视频尺寸,返回
local video_x, video_y = aegisub.video_size() if video_y then -- Correction factor for TextSub weirdness when render resolution does -- not match script resolution. Text pixels are considered square in -- render resolution rather than in script resolution, which is -- logically inconsistent. Correct for that. meta.video_x_correct_factor = (video_y / video_x) / (meta.res_y / meta.res_x) end aegisub.debug.out(4, "Karaskel: Video X correction factor = %f\n\n", meta.video_x_correct_factor)
return meta, stylesend最后处理的是视频,这一步同样也是为 TextSub 兼容而存在的。当视频分辨率与字幕分辨率不同时,其在 meta 中存入一个缩放因子,表示视频比例/字幕比例。
到此,收集头部的工作就全部完成了。
parse_templates
在这一步中,我们将通过字幕文件生成对应的模板/代码。
-- Find and parse/prepare all karaoke template linesfunction parse_templates(meta, styles, subs) local templates = { once = {}, line = {}, syl = {}, char = {}, furi = {}, styles = {} } local i = 1 while i <= #subs do aegisub.progress.set((i-1) / #subs * 100) local l = subs[i] i = i + 1 if l.class == "dialogue" and l.comment then local fx, mods = string.headtail(l.effect) fx = fx:lower() if fx == "code" then parse_code(meta, styles, l, templates, mods) elseif fx == "template" then parse_template(meta, styles, l, templates, mods) end templates.styles[l.style] = true elseif l.class == "dialogue" and l.effect == "fx" then -- this is a previously generated effect line, remove it i = i - 1 subs.delete(i) end end aegisub.progress.set(100) return templatesend首先还是初始化,接下来便是遍历所有字幕行。这一次需要处理的是 dialogue 行,因此 class 限定成了 dialogue。对于 dialogue,我们还需要有所取舍:对于注释行,我们尝试将其解析为模板;对于特效为 fx,也就是标记为生成行的,我们需要将其直接删除。
这里有一个辅助函数 string.headtail,其作用是以第一个空格为界限,将字符串分割为 head 和 tail 两个部分。[reference]
于是,我们将特效栏的内容分割成了 fx 和 mods 两块。接下来就是对不同的特效进行解析了:当 fx 为 code 时,对应代码行的处理方式;当 fx 为 template 时,对应模板行的处理方式。最后,模板行用到的样式被标记为 true。
parse_code
function parse_code(meta, styles, line, templates, mods) local template = { code = line.text, loops = 1, style = line.style } local inserted = false
local rest = mods while rest ~= "" do local m, t = string.headtail(rest) rest = t m = m:lower() if m == "once" then aegisub.debug.out(5, "Found run-once code line: %s\n", line.text) table.insert(templates.once, template) inserted = true elseif m == "line" then aegisub.debug.out(5, "Found per-line code line: %s\n", line.text) table.insert(templates.line, template) inserted = true elseif m == "syl" then aegisub.debug.out(5, "Found per-syl code line: %s\n", line.text) table.insert(templates.syl, template) inserted = true elseif m == "furi" then aegisub.debug.out(5, "Found per-furi code line: %s\n", line.text) table.insert(templates.furi, template) inserted = true elseif m == "all" then template.style = nil elseif m == "noblank" then template.noblank = true elseif m == "repeat" or m == "loop" then local times, t = string.headtail(rest) template.loops = tonumber(times) if not template.loops then aegisub.debug.out(3, "Failed reading this repeat-count to a number: %s\nIn template code line: %s\nEffect field: %s\n\n", times, line.text, line.effect) template.loops = 1 else rest = t end else aegisub.debug.out(3, "Unknown modifier in code template: %s\nIn template code line: %s\nEffect field: %s\n\n", m, line.text, line.effect) end end
if not inserted then aegisub.debug.out(5, "Found implicit run-once code line: %s\n", line.text) table.insert(templates.once, template) endend这里其实是针对不同的修饰语(modifier)进行的匹配。所有的修饰语可以同时使用,包括 once,line,syl,furi,all,noblank 和 repeat(alias = loop)。
once、line、syl 和 furi 对应的是四种执行模式,而 all、noblank 和 repeat 对应的是执行方式。没有指定执行模式的 code 行将会隐式地被归为 once。
对于执行方式,其经过了如下处理:
all:清空对应样式。noblank:设置noblank为true。loop:设置之后的数字为循环次数。当之后一项不为数字时,将循环次数修正为 1,继续执行之后代码;当之后一项为数字时,跳过数字项执行其之后代码。
代码行对应的内容就是该行 dialogue 的文本。
parse_template
模板的多样性比代码要多不少,但基本解析方式还是一样的。不多说,上源码:
-- List of reserved words that can't be used as "line" template identifierstemplate_modifiers = { "pre-line", "line", "syl", "furi", "char", "all", "repeat", "loop", "notext", "keeptags", "noblank", "multi", "fx", "fxgroup"}
function parse_template(meta, styles, line, templates, mods) local template = { t = "", pre = "", style = line.style, loops = 1, layer = line.layer, addtext = true, keeptags = false, fxgroup = nil, fx = nil, multi = false, isline = false, perchar = false, noblank = false } local inserted = false
local rest = mods while rest ~= "" do local m, t = string.headtail(rest) rest = t m = m:lower() if (m == "pre-line" or m == "line") and not inserted then aegisub.debug.out(5, "Found line template '%s'\n", line.text) -- should really fail if already inserted local id, t = string.headtail(rest) id = id:lower() -- check that it really is an identifier and not a keyword for _, kw in pairs(template_modifiers) do if id == kw then id = nil break end end if id == "" then id = nil end if id then rest = t end -- get old template if there is one if id and templates.line[id] then template = templates.line[id] elseif id then template.id = id templates.line[id] = template else table.insert(templates.line, template) end inserted = true template.isline = true -- apply text to correct string if m == "line" then template.t = template.t .. line.text else -- must be pre-line template.pre = template.pre .. line.text end elseif m == "syl" and not template.isline then table.insert(templates.syl, template) inserted = true elseif m == "furi" and not template.isline then table.insert(templates.furi, template) inserted = true elseif (m == "pre-line" or m == "line") and inserted then aegisub.debug.out(2, "Unable to combine %s class templates with other template classes\n\n", m) elseif (m == "syl" or m == "furi") and template.isline then aegisub.debug.out(2, "Unable to combine %s class template lines with line or pre-line classes\n\n", m) elseif m == "all" then template.style = nil elseif m == "repeat" or m == "loop" then local times, t = string.headtail(rest) template.loops = tonumber(times) if not template.loops then aegisub.debug.out(3, "Failed reading this repeat-count to a number: %s\nIn template line: %s\nEffect field: %s\n\n", times, line.text, line.effect) template.loops = 1 else rest = t end elseif m == "notext" then template.addtext = false elseif m == "keeptags" then template.keeptags = true elseif m == "multi" then template.multi = true elseif m == "char" then template.perchar = true elseif m == "noblank" then template.noblank = true elseif m == "fx" then local fx, t = string.headtail(rest) if fx ~= "" then template.fx = fx rest = t else aegisub.debug.out(3, "No fx name following fx modifier\nIn template line: %s\nEffect field: %s\n\n", line.text, line.effect) template.fx = nil end elseif m == "fxgroup" then local fx, t = string.headtail(rest) if fx ~= "" then template.fxgroup = fx rest = t else aegisub.debug.out(3, "No fxgroup name following fxgroup modifier\nIn template linee: %s\nEffect field: %s\n\n", line.text, line.effect) template.fxgroup = nil end else aegisub.debug.out(3, "Unknown modifier in template: %s\nIn template line: %s\nEffect field: %s\n\n", m, line.text, line.effect) end end
if not inserted then table.insert(templates.syl, template) end if not template.isline then template.t = line.text endend类似地,我们将修饰语归为执行模式和执行方式两种。
执行模式有:pre-line、line、syl、furi。
执行方式有 all、repeat、notext、keeptags、multi、char、noblank、fx 和 fxgroup。
这里与 code 最大的区别是执行模式之间是互斥的。一行 template 只能有一种执行模式,当存在另一种是,其将会被跳过。
preline,line
我们顺着往下看吧。L32-L47 是负责处理 id 和 rest 的。对于 id,唯一的规定就是不能与保留字相同。当与保留字相同时,根据代码逻辑,该名称将会被跳过,该行将会被当作未命名模板行处理。该保留字将在下一轮循环中再次解析。
接下来的 L48-L56 判断了处理方法。这里的 if id 是 if id != nil 的缩写,因此第一个判断的成立条件是:存在 id 且 存在同名模板。这时候,我们将现有模板覆盖为原有模板。
第二个判断则是:存在 id 且不存在同名模板。这时候,将模板的 id 设定为当前获取的 id,并且将其加入 templates.line。
否则,也就是不存在 id 的情况,此时将其以不指定名称的形式加入 template.line 中。
处理完上述步骤之后,L57-L64 就对应了模板合并的过程。首先设置 insert 和 isline 为 true 是为了避免重复解析(这在大 if 的各个分支中也有体现,这里不细讲),而下面的则是为了合并。对于 line,将其放到 template.t,而对 pre-line,将其放到 template.pre。这里如果对应的是上文的第一个判断成立的话,就是将新的内容 append 到旧内容之后,以达到模板合并的目的。
其他模式与方式
剩下的两种执行模式就很简单了,与 code 行的处理方式没有区别。而对于执行方式,fx、fxgroup 之后需要一个 identifier,repeat 和上文一致,而剩下的都只是简单的 bool 赋值,这里就不再阐述了
最后,若没有指定任何一种处理模式,则缺省模式为 syl;若非 line 类型的模板行(即 syl 或 furi),则内容缺省为该行文本内容。
到此,解析模板的部分全部结束。
// TODO: 这一部分没有将大段代码拆开,之后需要修改
apply_templates
这部分就是核心了。对于 code 行而言,其需要一个脚本的执行环境,这部分内容也是在这里构建的。我们称脚本的运行环境为 tenv。
tenv
初始化
-- the environment the templates will run in local tenv = { meta = meta, -- put in some standard libs string = string, math = math, _G = _G } tenv.tenv = tenv这里初始化了 tenv 中可用的内容:字幕文件的 meta 信息、string、math 和 对应全局作用域的 _G(即其他语言的 global)。最后,其将自身的引用存入 tenv.tenv 中。
retime
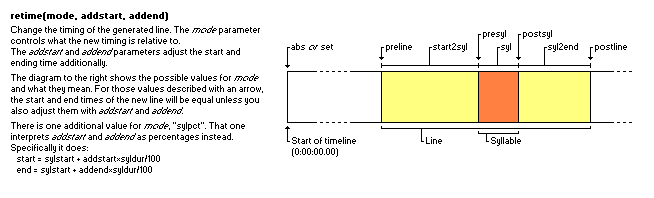
retime 函数是根据模式和偏移量重新设置该行字幕起止时间的辅助函数。Wiki 有一张图解释了各种模式的具体细节。[reference]
初始化
tenv.retime = function(mode, addstart, addend) local line, syl = tenv.line, tenv.syl local newstart, newend = line.start_time, line.end_time addstart = addstart or 0 addend = addend or 0初始化,从 tenv 取出 line 和 syl,从 line 取出 start_time 和 end_time,并将开始结束时间的偏移量默认设置为 0。
音节(syl)
if mode == "syl" then newstart = line.start_time + syl.start_time + addstart newend = line.start_time + syl.end_time + addend音节模式。起始时间是该音节的开始时间,结束时间是该音节的结束时间。
音节前(presyl)
elseif mode == "presyl" then newstart = line.start_time + syl.start_time + addstart newend = line.start_time + syl.start_time + addend音节前模式。起止时间均为该音节的开始时间。
音节后(postsyl)
elseif mode == "postsyl" then newstart = line.start_time + syl.end_time + addstart newend = line.start_time + syl.end_time + addend音节后模式。起止时间均为该音节的结束时间。
行(line)
elseif mode == "line" then newstart = line.start_time + addstart newend = line.end_time + addend行模式。起始时间为该行的起始时间,结束时间为该行的结束时间。
行前(preline)
elseif mode == "preline" then newstart = line.start_time + addstart newend = line.start_time + addend行前模式。起止时间均为该行的起始时间。
行后(postline)
elseif mode == "postline" then newstart = line.end_time + addstart newend = line.end_time + addend行后模式。起止时间均为该行的结束时间。
行前至音节(start2syl)
elseif mode == "start2syl" then newstart = line.start_time + addstart newend = line.start_time + syl.start_time + addend行前至音节模式。起始时间为该行的起始时间,结束时间为该音节的起始时间。
音节至行后(syl2end)
elseif mode == "syl2end" then newstart = line.start_time + syl.end_time + addstart newend = line.end_time + addend音节至行后模式。起始时间为该音节的结束时间,结束时间为该行的结束时间。
绝对时间(set/abs)
elseif mode == "set" or mode == "abs" then newstart = addstart newend = addend绝对时间模式。直接设置起始时间,无任何相对关系。
百分比音节(sylpct)
elseif mode == "sylpct" then newstart = line.start_time + syl.start_time + addstart*syl.duration/100 newend = line.start_time + syl.start_time + addend*syl.duration/100百分比音节模式。相对该音节的持续时间计算偏移。
愿望单
-- wishlist: something for fade-over effects, -- "time between previous line and this" and -- "time between this line and next" end这功能还没加,估计是摸了。
回写
line.start_time = newstart line.end_time = newend line.duration = newend - newstart return "" end设置该行的起止时间和持续时间。
fxgroup
tenv.fxgroup = {}初始化 fxgroup。
relayer
tenv.relayer = function(layer) tenv.line.layer = layer return "" end辅助函数 relayer,负责将 tenv 当前处理行的 layer 修改为指定值。
restyle
tenv.restyle = function(style) tenv.line.style = style tenv.line.styleref = styles[style] return "" end辅助函数 restyle,负责将当前处理行的样式设定为指定样式,并将指定样式的具体引用存储于 styleref 中。
maxloop(s)
tenv.maxloop = function(newmaxj) tenv.maxj = newmaxj return "" end tenv.maxloops = tenv.maxloop辅助函数 maxloop 以及别名 maxloops,负责将 tenv 的 maxj 设定为指定值。
loopctl
tenv.loopctl = function(newj, newmaxj) tenv.j = newj tenv.maxj = newmaxj return "" end辅助函数 loopctl,负责同时设置 j 和 maxj。
recall
辅助函数 recall,和下文的诸多 remember 函数一起,属于持久存储部分的内容。通过将数据存储在 recall 本身的 table 中,以达到跨脚本共享的目的。
初始化
tenv.recall = {} setmetatable(tenv.recall, { decorators = {},decorator 本身存储在 metatable 中是为了防止出现 name 为 decorator 的持久项使 decorator 被覆盖。
为了方便起见,后文提到对应元表(metatable)时会以 prototype 替换。
__call
__call = function(tab, name, default) local decorator = getmetatable(tab).decorators[name] if decorator then name = decorator(tostring(name)) end aegisub.debug.out(5, "Recalling '%s'\n", name) return tab[name] or default end,__call 定义了调用时的操作。调用 recall 时,首先会尝试获取对应的真实名称修饰器(decorators[name])并将执行结果覆盖 name,然后返回 tab[name],或不存在时返回 default。
decorator_[a-z]+
decorator_line = function(name) return string.format("_%s_%s", tostring(tenv.orgline), name) end, decorator_syl = function(name) return string.format("_%s_%s", tostring(tenv.syl), name) end, decorator_basesyl = function(name) return string.format("_%s_%s", tostring(tenv.basesyl), name) end })这三个 decorator_[a-z]+ 是辅助函数,配合下文使用的。我们先往下看。
remember
辅助函数 remember,持久存储的存储部分。
获取真实名称
tenv.remember = function(name, value, decorator) getmetatable(tenv.recall).decorators[name] = decorator if decorator then name = decorator(tostring(name)) end aegisub.debug.out(5, "Remembering '%s' as '%s'\n", name, tostring(value))给定 name 和 value,其通过真实名称修饰器(decorator)修饰后存入 tenv.recall,并将修饰器存入 tenv.recall.prototype.decorator。
读取并返回
tenv.recall[name] = value return value end函数返回存入的值。这个返回值一般用于内联代码以简化语句。如:
{\t(!remember("time", math.random(10,20)*10)!, !line.duration!, !recall.time!}remember_(line|(base)?syl)
tenv.remember_line = function(name, value) return tenv.remember(name, value, getmetatable(tenv.recall).decorator_line) end tenv.remember_syl = function(name, value) return tenv.remember(name, value, getmetatable(tenv.recall).decorator_syl) end tenv.remember_basesyl = function(name, value) return tenv.remember(name, value, getmetatable(tenv.recall).decorator_basesyl) end辅助函数 remember_[a-z]+,对应上文的 tenv.recall.prototype.decorator_[a-z]+,是三个预定义了 decorator 函数的 remember 函数。某种意义上是相当于语法糖的存在。
remember_if
辅助函数 remember_if,负责在 condition 生效时执行对应的 remember 操作。
tenv.remember_if = function(name, value, condition, decorator) if condition then return tenv.remember(name, value, decorator) end return value endcode once
在初始化好 tenv 之后,首先要运行的就是 template.once。在这一步,所有的 once 代码行全部执行完成。该循环如下所示:
-- 运行所有的 code once 代码片段 for k, t in pairs(templates.once) do assert(t.code, "WTF, a 'once' template without code?") run_code_template(t, tenv) end这里断言(assert)了所有代码行都有内容。具体的执行过程在 run_code_template 中,我们跳转过去看看。
run_code_template
加载代码
function run_code_template(template, tenv) local f, err = loadstring(template.code, "template code") if not f then aegisub.debug.out(2, "Failed to parse Lua code: %s\nCode that failed to parse: %s\n\n", err, template.code)通过 loadString 将对应文本转化为函数,传入的第二个参数设置了 chunk name。
当代码存在语法错误或其他问题时,返回 err,执行失败。
设置环境、循环次数
else local pcall = pcall setfenv(f, tenv) for j, maxj in template_loop(tenv, template.loops) do这里将 pcall 引用存下供下文调用,并将 tenv 设置为函数 f 的执行环境。
值得注意的是,这里 for ... in 的是一个函数的返回值。我们跳往那个函数,也就是 template_loop 看看。
template_loop
-- 迭代器函数,返回一个以 tenv.j 和 tenv.maxj 控制的迭代器function template_loop(tenv, initmaxj) local oldmaxj = initmaxj tenv.maxj = initmaxj tenv.j = 0 local function itor() if tenv.j >= tenv.maxj or aegisub.progress.is_cancelled() then return nil else tenv.j = tenv.j + 1 if oldmaxj ~= tenv.maxj then aegisub.debug.out(5, "Number of loop iterations changed from %d to %d\n", oldmaxj, tenv.maxj) oldmaxj = tenv.maxj end return tenv.j, tenv.maxj end end return itorend这个函数负责的是控制迭代次数。其在其执行开始时存储了传入的 initmaxj,并将循环次数设置为 0。之后,返回了一个迭代器:每次迭代执行时,其首先检查是否超出迭代次数或用户打断,此时,迭代中止;否则,迭代次数自加,且当 tenv.maxj 被手动设置时,以新的 tenv.maxj 覆盖旧的。
这里个人感觉有问题。如果这轮循环之前设置了
tenv.maxj,那在这个值还没有更新的时候第一个if是不成立的,而在更新后其就成立了,相当于多运行了一个循环,可能会导致不可知的问题。个人建议修复:将
if oldmaxj ~= tenv.maxj一段移至local function itor()开头。
正式调用
local res, err = pcall(f) if not res then aegisub.debug.out(2, "Runtime error in template code: %s\nCode producing error: %s\n\n", err, template.code) end end endend通过 pcall 调用字符串生成的函数。
通过 pcall 调用的函数模式为保护模式,在这个模式下,函数执行出现问题时并不会直接 panic,而是返回错误,也就是第二个返回值 err。
正式处理
由于正式处理的过程调用了大量函数,这里我们把其调用的函数和其本身同级显示,以保证目录的级数可用。
主循环
-- 开始处理行 local i, n = 0, #subs while i < n do aegisub.progress.set(i/n*100) i = i + 1首先初始化了 i 和 n。这里把 i 初始化为 0 是因为 lua 的下标从 1 开始,于后面的 i = i + 1 对应。
处理条件
local l = subs[i] if l.class == "dialogue" and ((l.effect == "" and not l.comment) or l.effect:match("[Kk]araoke")) then循环是针对字幕所有行的,对于当前循环行 l,只在其为 dialogue 的时候对其进行处理;只在该行的特效为空且不为注释,或该行的特效为 [Kk]araoke 时对其进行处理。特效为空且不为注释的情况是未处理过的行,而特效未 [Kk]araoke 则是之前运行时处理过且被标记了的行。
处理前操作
l.i = i l.comment = false karaskel.preproc_line(subs, meta, styles, l)在正式处理前,首先先记录下当前行的下标 i,并且将其注释关闭。接下来,运行 **karaskel.preproc_line**,处理字幕位置。
正式处理与处理后操作
if apply_line(meta, styles, subs, l, templates, tenv) then -- 有样式应用到这行了 将其标记为 karaoke 行 l.comment = true l.effect = "karaoke" subs[i] = l end end endend正式处理调用的是 **apply_line**。当返回有效时,表示样式应用成功。
应用成功后执行处理后操作:将当前行修改为注释行,将特效设置为 karaoke,覆盖回字幕文件。
karaskel.preproc_line
-- 预计算行的一些信息-- 会修改 line 参数function karaskel.preproc_line(subs, meta, styles, line) -- subs 参数不会用到 并且可能永远不会用到 -- (哪一行突然改变 index 这件事情就不大对) -- 随便传入,但小心直接调用 preproc_line_pos,函数签名可能会变 karaskel.preproc_line_pos(meta, styles, line)end可以看到,实际调用的是 preproc_line_pos。
karaskel.preproc_line_pos
预处理:计算行尺寸
-- 布置行布局 包括注音布局-- 会修改行对象function karaskel.preproc_line_pos(meta, styles, line) if not line.styleref then karaskel.preproc_line_size(meta, styles, line) end当样式不存在时,我们先去生成/匹配样式。
这里调用的是 preproc_line_size 函数,其在计算整行大小时也将所有的样式应用到了各个音节。传送门
布局:注音布局
-- 注音布局必须在其他步骤之前进行,因为其可能会改变整行宽度 if line.furistyle then karaskel.do_furigana_layout(meta, styles, line)布局:基本布局
else karaskel.do_basic_layout(meta, styles, line) end不考虑注音的超简单布局,我们直接来看对应函数。
karaskel.do_basic_layout
-- 进行基本音节布局(无注音)function karaskel.do_basic_layout(meta, styles, line) local curx = 0 for i = 0, line.kara.n do local syl = line.kara[i] syl.left = curx + syl.prespacewidth syl.center = syl.left + syl.width / 2 syl.right = syl.left + syl.width curx = curx + syl.prespacewidth + syl.width + syl.postspacewidth endend对于一行中的每一个音节,将 left、center 和 right 分别通过 width 计算出来即可。
外边距(margin)
-- 有效(实际)外边距 line.margin_v = line.margin_t line.eff_margin_l = ((line.margin_l > 0) and line.margin_l) or line.styleref.margin_l line.eff_margin_r = ((line.margin_r > 0) and line.margin_r) or line.styleref.margin_r line.eff_margin_t = ((line.margin_t > 0) and line.margin_t) or line.styleref.margin_t line.eff_margin_b = ((line.margin_b > 0) and line.margin_b) or line.styleref.margin_b line.eff_margin_v = ((line.margin_v > 0) and line.margin_v) or line.styleref.margin_v该行的实际外边距:line.margin_\w+ 存在时为 line.margin_\w+,不存在时为样式对应的外边距。
水平定位
左对齐
-- 以及定位 if line.styleref.align == 1 or line.styleref.align == 4 or line.styleref.align == 7 then -- 左对齐 line.left = line.eff_margin_l line.center = line.left + line.width / 2 line.right = line.left + line.width line.x = line.left line.halign = "left"左对齐对应的是 align 为 1、4、7 的情况。此时,该行的 left 为左边距,center 为左边距+一半宽度,right 为左边距+宽度。由于是左对齐,x 为 left。
halign 是该行对齐方式的文本表述,此时为 left。
居中对齐
elseif line.styleref.align == 2 or line.styleref.align == 5 or line.styleref.align == 8 then -- 居中对齐 line.left = (meta.res_x - line.eff_margin_l - line.eff_margin_r - line.width) / 2 + line.eff_margin_l line.center = line.left + line.width / 2 line.right = line.left + line.width line.x = line.center line.halign = "center"居中对齐对应的是 align 为2、5、8 的情况。此时,想要计算出一行的 left,必须考虑视频宽度、左右边距和行宽。视频宽度减去左右边距和行宽后,剩下的区域需要平分,再加上左边距,就是该行的 left 了。
同理计算出 center 和 right。由于是居中对齐,x 为 center。
右对齐
elseif line.styleref.align == 3 or line.styleref.align == 6 or line.styleref.align == 9 then -- 右对齐 line.left = meta.res_x - line.eff_margin_r - line.width line.center = line.left + line.width / 2 line.right = line.left + line.width line.x = line.right line.halign = "right" end line.hcenter = line.center右对齐对应的是 align 为 3、6、9 的情况。与左对齐类似,此处不再阐述。
最后,记录下该行的 hcenter,记为垂直中心。
垂直定位
if line.styleref.align >=1 and line.styleref.align <= 3 then -- 底部对齐 line.bottom = meta.res_y - line.eff_margin_b line.middle = line.bottom - line.height / 2 line.top = line.bottom - line.height line.y = line.bottom line.valign = "bottom" elseif line.styleref.align >= 4 and line.styleref.align <= 6 then -- 垂直居中 line.top = (meta.res_y - line.eff_margin_t - line.eff_margin_b - line.height) / 2 + line.eff_margin_t line.middle = line.top + line.height / 2 line.bottom = line.top + line.height line.y = line.middle line.valign = "middle" elseif line.styleref.align >= 7 and line.styleref.align <= 9 then -- 顶部对齐 line.top = line.eff_margin_t line.middle = line.top + line.height / 2 line.bottom = line.top + line.height line.y = line.top line.valign = "top" end line.vcenter = line.middleend垂直定位与水平定位基本一致,此处省略。最后记录下了该行的 vcenter,记为水平中心。
karaskel.preproc_line_size
预处理:音节信息
-- 预计算指定行的大小信息,不作布局处理-- 会修改行对象function karaskel.preproc_line_size(meta, styles, line) if not line.kara then karaskel.preproc_line_text(meta, styles, line) end当 line.kara 不存在时,预处理该行的文本。传送门
简单介绍一下这个函数的作用吧,它将注音由 line 对象解析成了 line.kara,其中对应每个音节和注音都有了时间等关键信息。
存储样式引用
-- 增加样式信息 if styles[line.style] then line.styleref = styles[line.style] else aegisub.debug.out(2, "WARNING: Style not found: " .. line.style .. "\n") line.styleref = styles[1] end在这一步,对应行的样式被存储到了 line.styleref 中。当样式不存在时,会使用全局样式中的第一个。
计算整行大小
-- 计算整行大小 line.width, line.height, line.descent, line.extlead = aegisub.text_extents(line.styleref, line.text_stripped) line.width = line.width * meta.video_x_correct_factor通过 aegisub.text_extents 获取该行应用对应样式时的宽、高、descent 和 extlead。该函数对应的 Wiki 在此:[reference]
最后,乘上 video_x_corrent_factor。
计算音节大小
-- 计算音节大小 for s = 0, line.kara.n do local syl = line.kara[s] syl.style = line.styleref syl.width, syl.height = aegisub.text_extents(syl.style, syl.text_spacestripped) syl.width = syl.width * meta.video_x_correct_factor syl.prespacewidth = aegisub.text_extents(syl.style, syl.prespace) * meta.video_x_correct_factor syl.postspacewidth = aegisub.text_extents(syl.style, syl.postspace) * meta.video_x_correct_factor end循环获取每个音节、prespace 和 postspace 的宽和高,对宽乘上 video_x_corrent_factor。
计算注音大小
-- 计算注音大小 if styles[line.style .. "-furigana"] then line.furistyle = styles[line.style .. "-furigana"] else aegisub.debug.out(4, "No furigana style defined for style '%s'\n", line.style) line.furistyle = false end if line.furistyle then for f = 1, line.furi.n do local furi = line.furi[f] furi.style = line.furistyle furi.width, furi.height = aegisub.text_extents(furi.style, furi.text) furi.width = furi.width * meta.video_x_correct_factor furi.prespacewidth = 0 furi.postspacewidth = 0 end endend在计算之前,首先需要寻找注音样式($style-furigana)。当样式存在时,才进行进一步处理。
当样式存在时,遍历所有注音,计算其宽高并乘以 video_x_corrent_factor。注音的前后留白宽度为 0。
至此,全行的大小信息均计算完毕。传送回去
karaskel.preproc_line_text
这一部分负责处理的是预处理文本,包括注音等内容。该函数假定了所有输入行都满足 class=dialogue,使用时须注意。
由于其有用到 Aegisub 的 API,下面我们先来介绍 API 接口。
aegisub.parse_karaoke_data
这一部分是 Aegisub 自带的 API,因此本文不作源码解析,但这里给出定义:
type syl_base struct { duration float64 start_time float64 end_time float64 tag string text string // 原文本 text_stripped string // 移除了特效标签和绘图指令的文本}
type parse_karaoke_data func(line Line) []syl_base初始化
-- Pre-process line, determining stripped text, karaoke data and splitting off furigana data-- 会修改 line 对象的内容function karaskel.preproc_line_text(meta, styles, line) -- 假定所有行都是 class=dialogue local kara = aegisub.parse_karaoke_data(line) line.kara = { n = 0 } line.furi = { n = 0 }
line.text_stripped = "" line.duration = line.end_time - line.start_time
local worksyl = { highlights = {n=0}, furi = {n=0} } local cur_inline_fx = ""首先仍然是初始化,这一步通过解析 line 获取了对应的 kara,并且将 line 的 kara、furi、text_stripped 设置为初始值。此外,还计算了 duration 的数值,并初始化了下面循环中要用到的 worksyl 和 cur_inline_fx(即 current_inline_fx)。
检测内联标签
for i = 0, #kara do local syl = kara[i]
-- 检测内联标签 local inline_fx = syl.text:match("%{.*\\%-([^}\\]+)") if inline_fx then cur_inline_fx = inline_fx end这里开始了主循环,保存 syl,并开始检测内联标签。
这里用到的是 Lua 的 Pattern,不熟悉的读者可以参考这篇文章。这行 Pattern 对应的正则表达式为:{.*\\-([^}\]+)。
当捕获到内容,即符合内联标签的 Pattern 时,将当前音节(syl)的内联标签设置为捕获到的 inline_fx。
处理音节结束
-- 删除空格(只包括基本符号,不包含全角空格) local prespace, syltext, postspace = syl.text_stripped:match("^([ \t]*)(.-)([ \t]*)$")
-- See if we've broken a (possible) multi-hl stretch -- If we did it's time for a new worksyl (though never for the zero'th syllable) local prefix = syltext:sub(1,unicode.charwidth(syltext,1)) if prefix ~= "#" and prefix ~= "#" and i > 0 then line.kara[line.kara.n] = worksyl line.kara.n = line.kara.n + 1 worksyl = { highlights = {n=0}, furi = {n=0} } end在处理之前,我们要先把文本前后的空符号去除。之后,我们处理音节结束的特殊情况,这里比较特殊的是需要判断注音。
我们知道,注音的卡拉 OK 格式为:原文|内容。当原文不存在时,用 # 代替,代表原文和上一个音节的原文一致。
因此,当我们检测到该音节的第一个字符并非 # 时,代表上一个音节可以正常结束,这时,就将 worksyl 加入 kara 中,并将 kara 的长度标记 n 加一。
这里判断的 i > 0 是为了防止第一个音节的误判。第一个音节必定要包含原文,因此要防止遇到该音节时直接将空的 worksyl 加入 kara。
存入当前音节
-- 增加高亮数据 local hl = { start_time = syl.start_time, end_time = syl.end_time, duration = syl.duration } worksyl.highlights.n = worksyl.highlights.n + 1 worksyl.highlights[worksyl.highlights.n] = hl这里需要解释的是 highlight 的概念。我们知道,卡拉 OK 特效一般的结果都是高亮。不论是文字意义上的高亮,还是特效元素意义上的高亮,高亮是指向当前文字位置的一个标识。
从传统的卡拉 OK 效果角度来说,对于注音,其高亮本身伴随的是原文的高亮。因此,可以说原文的高亮必须依托注音的高亮而生成。由此就产生了一个高亮队列,其中各个发音(也可以说是音节)从前往后依次高亮,同时这个过程也伴随着原文的高亮。这也就是这段代码中的 worksyl.highlights。而 hl,则是当前音节的起止时间数据。
既然前面已经处理好了音节的结束,这里就直接把当前音节的信息存入 worksyl 的 highlights Table 里就可以了。
处理注音:初始化
-- 寻找注音(全角半角皆可) -- 注音与音节分别存储 if syltext:find("|") or syltext:find("|") then -- 全部替换成半角 | 全角正则不友好 syltext = syltext:gsub("|", "|") -- 获取前后文本 local maintext, furitext = syltext:match("^(.-)|(.-)$") syltext = maintext
local furi = { } furi.syl = worksyl首先是判断注音是否存在。正如上文描述的格式一般,分隔线隔开的两个部分分别为原文和注音。这里可以使用半角或全角的 |。
等到了真正的处理流程,所有的全角分隔符都被替换成半角以方便处理。之后,通过文本匹配获得 | 前后的文本,并将音节文本修改为原文。
最后,新建一个 furi Table,并将母音节的引用存入 furi.syl。
处理注音:样式
-- 魔法来了 -- isbreak = 即使主文本相邻,也不在视觉上将注音相连 -- spillback = 允许注音偏移到主文本左侧 -- (注音是一定允许偏移到主文本右侧的) local prefix = furitext:sub(1,unicode.charwidth(furitext,1)) if prefix == "!" or prefix == "!" then furi.isbreak = true furi.spillback = false elseif prefix == "<" or prefix == "<" then furi.isbreak = true furi.spillback = true else furi.isbreak = false furi.spillback = false end -- 移除特殊模式下的前缀字符 if furi.isbreak then furitext = furitext:sub(unicode.charwidth(furitext,1)+1) end这里规定了 isbreak 和 spillback 两种属性,默认全部关闭,根据用户配置选择性开启。
用户需要配置注音前缀以启用部分设置。对于 !,启用 isbreak;对于 <,启用 spillback。两种符号都支持全角。
三个模式的区别如下。
默认模式,注音从左到右:

中断模式,注音从左到右,但不侵占其他音节的空间:

中断左移模式,其所在音节与注音中点处于同一直线:

[reference]
处理注音:其他属性
-- 有些看起来可能有点多余,但理想情况下注音应该和音节接口相同 furi.start_time = syl.start_time furi.end_time = syl.end_time furi.duration = syl.duration furi.kdur = syl.duration / 10 furi.text = furitext furi.text_stripped = furitext furi.text_spacestripped = furitext furi.line = line furi.tag = syl.tag furi.inline_fx = cur_inline_fx furi.i = line.kara.n furi.prespace = "" furi.postspace = "" furi.highlights = { n=1, [1]=hl } furi.isfuri = true
line.furi.n = line.furi.n + 1 line.furi[line.furi.n] = furi worksyl.furi.n = worksyl.furi.n + 1 worksyl.furi[worksyl.furi.n] = furi end为了保持音节和注音的接口一致性,这里增加了一些看似无用的内容。
重要的属性有:
start_time、end_time、duration:的时间信息text等:文本信息inline_fx:内联特效信息i:当前注音在主音节中下标highlights:高亮即为自身isfuri:顾名思义
最后,将注音加入该行和主音节的注音列表中。
处理主音节:无文本/有文本但前缀不为 #
-- 不属于多高亮的音节生成新音节 if not worksyl.text or (prefix ~= "#" and prefix ~= "#") then -- 更新 text_stripped line.text_stripped = line.text_stripped .. prespace .. syltext .. postspace
-- 从 syl 拷贝信息到 worksyl worksyl.text = syl.text worksyl.duration = syl.duration worksyl.kdur = syl.duration / 10 worksyl.start_time = syl.start_time worksyl.end_time = syl.end_time worksyl.tag = syl.tag worksyl.line = line
-- 增加新信息到 worksyl worksyl.i = line.kara.n worksyl.text_stripped = prespace .. syltext .. postspace -- be sure to include the spaces so the original line can be built from text_stripped worksyl.inline_fx = cur_inline_fx worksyl.text_spacestripped = syltext worksyl.prespace = prespace worksyl.postspace = postspace这种情况一般出现于新的主音节开始之时。这时候 worksyl 基本为空,需要填充主音节的信息。
处理主音节:新高亮
else -- This is just an extra highlight worksyl.duration = worksyl.duration + syl.duration worksyl.kdur = worksyl.kdur + syl.duration / 10 worksyl.end_time = syl.end_time end end对应有文本或前缀为 # 的情况。这种情况下就将更新当前工作音节的时间信息。
最后写入,返回
-- Add the last syllable line.kara[line.kara.n] = worksyl -- But don't increment n here, n should be the highest syllable index! (The zero'th syllable doesn't count.)end将最后一个音节加入 line.kara 中,但不更新 n,因为 n 代表的是最后一个音节的下标。
至此,karaskel.preproc_line_text 分析完毕。传送回去
karaskel.do_furigana_layout
初始化
-- 执行高级(advanced)注音布局算法function karaskel.do_furigana_layout(meta, styles, line) -- 从构建布局组开始 -- 两个相邻的、带有注音的音节属于同一布局组 -- 强制打断会创建一个新的布局组(注:isbreak) local lgroups = {} -- 布局组哨兵 local lgsentinel = {basewidth=0, furiwidth=0, syls={}, furi={}, spillback=false, left=0, right=0} table.insert(lgroups, lgsentinel) -- 创建布局组 local last_had_furi = false local lg = { basewidth=0, furiwidth=0, syls={}, furi={}, spillback=false }总之是很普通的初始化过程。这里多了给 lgsentinel,只在开头和结尾存在,意义不明,后面的循环也将其跳过了。如果有知道含义的大佬欢迎指出。
布局组
处理上一组
for s = 0, line.kara.n do local syl = line.kara[s] -- 对无注音音节创建新布局组 -- 对 marked as split 的 furigana-endowed 注音创建新布局组 -- 但如果当前的布局组没有宽度就不创建新的 aegisub.debug.out(5, "syl.furi.n=%d, isbreak=%s, last_had_furi=%s, lg.basewidth=%d\n", syl.furi.n, syl.furi.n > 0 and syl.furi[1].isbreak and "y" or "n", last_had_furi and "y" or "n", lg.basewidth) if (syl.furi.n == 0 or syl.furi[1].isbreak or not last_had_furi) and lg.basewidth > 0 then aegisub.debug.out(5, "Inserting layout group, basewidth=%d, furiwidth=%d, isbreak=%s\n", lg.basewidth, lg.furiwidth, syl.furi.n > 0 and syl.furi[1].isbreak and "y" or "n") table.insert(lgroups, lg) lg = { basewidth=0, furiwidth=0, syls={}, furi={}, spillback=false } last_had_furi = false end这里说的上一组有点遗留问题的感觉,这其实时循环末尾的内容提到了开头。如果当前音节没有注音,或者第一个注音就为中断,或者不是最后一个注音,且当前布局组的宽度(basewidth)大于 0,则将当前布局组加入布局组表中,并且重置 lg 和 last_had_furi。
加入当前音节
-- 将音节加入布局组 lg.basewidth = lg.basewidth + syl.prespacewidth + syl.width + syl.postspacewidth table.insert(lg.syls, syl) aegisub.debug.out(5, "\tAdding syllable to layout group: '%s', width=%d, isbreak=%s\n", syl.text_stripped, syl.width, syl.furi.n > 0 and syl.furi[1].isbreak and "y" or "n")这里将布局组的宽度(basewidth)加上了音节的宽度,并将音节加入了布局组中。
加入当前音节注音
-- 将该音节的注音加入布局组 for f = 1, syl.furi.n do local furi = syl.furi[f] lg.furiwidth = lg.furiwidth + furi.width lg.spillback = lg.spillback or furi.spillback table.insert(lg.furi, furi) aegisub.debug.out(5, "\tAdding furigana to layout group: %s (width=%d)\n", furi.text, furi.width) last_had_furi = true end end在加入注音时,同时加上注音的宽度(width),并且当其中一个注音允许 spillback 时,整个布局组允许溢出(即观感上的注音左移,文本右移)。
最后,标记 last_had_furi 为 true。至此,对每个音节的循环结束。
加入最后一组
-- 加入最后的布局组 aegisub.debug.out(5, "Inserting layout group, basewidth=%d, furiwidth=%d\n", lg.basewidth, lg.furiwidth) table.insert(lgroups, lg) -- 加入尾哨兵 table.insert(lgroups, lgsentinel)最后,由于加入布局组表的操作在循环开头,因此这里我们要把最后一组没有轮到循环的布局组加入表中。
生成布局
初始化
aegisub.debug.out(5, "\nProducing layout from %d layout groups\n", #lgroups-1) -- 在宏级别布置布局组 -- 在循环结束时跳过哨兵 local curx = 0 for i = 2, #lgroups-1 do local lg = lgroups[i] local prev = lgroups[i-1] aegisub.debug.out(5, "Layout group, nsyls=%d, nfuri=%d, syl1text='%s', basewidth=%f furiwidth=%f, ", #lg.syls, #lg.furi, lg.syls[1] and lg.syls[1].text or "", lg.basewidth, lg.furiwidth)这里从 2 开始循环到 lgroup.length - 1。循环体内定义了当前组(lg)和上一组(prev)。
情况一:无注音
-- 三种情况:无注音,注音比 base 小,注音比 base 大 if lg.furiwidth == 0 then -- 直接放置 base 文本 lg.left = curx lg.right = lg.left + lg.basewidth -- 如果这里右前一组的溢出,将其放置于此 if prev.rightspill and prev.rightspill > 0 then aegisub.debug.out(5, "eat rightspill=%f, ", prev.rightspill) lg.leftspill = 0 lg.rightspill = prev.rightspill - lg.basewidth prev.rightspill = 0 end curx = curx + lg.basewidth在无注音的情况下,当前布局组的 left 显然就是当前的 x,right 也显然为当前的 left 加上 base 的宽度。
这种情况下唯一需要处理的特殊情况是由上一组带来的右溢。如果上一组存在右溢,则将上一组的右溢清空,减去本组的宽度,设置为本组的右溢。同时,这种情况下不存在左溢,故将左溢设置为 0。
最后,当前行的 x(curx)需加上当前布局组的宽度。
情况二:注音宽度小于(等于)布局组
elseif lg.furiwidth <= lg.basewidth then -- 如果上一组存在右溢,我们必须知道(并处理) if prev.rightspill and prev.rightspill > 0 then aegisub.debug.out(5, "skip rightspill=%f, ", prev.rightspill) curx = curx + prev.rightspill prev.rightspill = 0 end lg.left = curx lg.right = lg.left + lg.basewidth curx = curx + lg.basewidth -- 负值左溢 lg.leftspill = (lg.furiwidth - lg.basewidth) / 2 lg.rightspill = lg.leftspill在注音宽度小于等于布局组的情况下,我们首先处理右溢的问题。由于我们现在已经处于了一个全新的布局组,因此如果上一组存在右溢,那我们的 base 文本就不能在有注音的位置渲染。因此,主文本必须偏移上一组右溢的宽度值,也就是 L5 的内容。
最后,由于注音宽度比布局组小,因此需要将其居中放置。居中放置的方式就是设置当前文本的左溢为负值,数值为 (注音宽度-基宽度) / 2。(这里不大明白,可能有误。FIXME)
情况三:注音宽度大于布局组
else -- 注音宽度比 base 大,必须在某个方向上产生溢出 if prev.rightspill and prev.rightspill > 0 then aegisub.debug.out(5, "skip rightspill=%f, ", prev.rightspill) curx = curx + prev.rightspill prev.rightspill = 0 end与上一种情况相同的右溢处理办法。
-- 是否只向右溢出 if lg.spillback then -- 双向溢出 lg.leftspill = (lg.furiwidth - lg.basewidth) / 2 lg.rightspill = lg.leftspill aegisub.debug.out(5, "spill left=%f right=%f, ", lg.leftspill, lg.rightspill) -- 不能覆盖上一组的右溢 if prev.rightspill then lg.left = curx + lg.leftspill else lg.left = curx end当溢出选项设置允许左溢时,此时左溢的宽度和右溢相等。
特殊地,检查上一组是否存在右溢。注意,这里只检查了存在性,而并没有规定其必须大于 0。因为我们知道,存在溢出的情况一定是存在注音的情况,而当存在注音时,我们不应该覆盖上一组的任何文本。
因此,当上一组存在右溢时,即代表上一组存在注音。此时,将当前布局组的 left 加上当前布局组的左溢,使得 base 文本居中。这样,上方注音的最左便是 curx,也就一定不会产生覆盖了。
当上一组不存在右溢时,表示上一组不存在注音,此时可以将左溢安心(?)地覆盖上去。
但其实也不大对,如果上一组的文本较短而本组的左溢过长,那就会覆盖到上上组,还是存在覆盖的问题。如下图所示:

else -- 只右溢 lg.leftspill = 0 lg.rightspill = lg.furiwidth - lg.basewidth aegisub.debug.out(5, "spill right=%f, ", lg.rightspill) lg.left = curx end当不允许左溢时,只产生右溢。此时左溢设置为 0,右溢设置为溢出的宽度。
lg.right = lg.left + lg.basewidth curx = lg.right end aegisub.debug.out(5, "left=%f, right=%f\n", lg.left, lg.right) end最后,更新 lg.right 为 lg.left 加上 base 文本宽度,并将 curx 设置为最右点。
写回布局
现在,布局组的计算已经完成了,接下来只要将位置信息写回各音节/注音即可。
初始化
-- 布局组已完成布局,将布局拆分到各个音节/注音 for i, lg in ipairs(lgroups) do local basecenter = (lg.left + lg.right) / 2 -- centered furi is centered over this local curx = lg.left -- base text is placed from here on初始化过程中计算了 basecenter(然而并没有用到),并定义了当前 x(curx)。
写回音节
-- 写回音节 for s, syl in ipairs(lg.syls) do syl.left = curx + syl.prespacewidth syl.center = syl.left + syl.width/2 syl.right = syl.left + syl.width curx = syl.right + syl.postspacewidth end写回音节遍历当前布局组中所有音节,并设置其左、中心、右的坐标。需要注意的是,音节可能有首位空字符,这里需要一并加入。
准备写回注音
if curx > line.width then line.width = curx end -- 写回注音 if lg.furiwidth < lg.basewidth or lg.spillback then -- 布局组居中 curx = lg.left + (lg.basewidth - lg.furiwidth) / 2 else -- 左对齐 curx = lg.left end首先处理的时特殊情况:如果 curx 大于行宽了,那么更新行宽为 curx。
接下来是准备写回注音的环节。当注音宽度小于 base 文本宽度,或设置允许左溢时,我们要将注音居中;否则,左对齐即可。
写回注音
for f, furi in ipairs(lg.furi) do furi.left = curx furi.center = furi.left + furi.width/2 furi.right = furi.left + furi.width curx = furi.right end endend最后是写回注音,处理方式与写回音节相同,此处省略。
至此,注音布局完成。传送回去
apply_line
到了这一步,所有的计算之类的都已经完成,所有的音节和注音的位置都已经正确地存储在了内存中,接下来我们要做的,就是根据用户的输入,正确地生成卡拉 OK 特效了。
初始化
function apply_line(meta, styles, subs, line, templates, tenv) -- Tell whether any templates were applied to this line, needed to know whether the original line should be removed from input local applied_templates = false
-- General variable replacement context local varctx = { layer = line.layer, lstart = line.start_time, lend = line.end_time, ldur = line.duration, lmid = line.start_time + line.duration/2, style = line.style, actor = line.actor, margin_l = ((line.margin_l > 0) and line.margin_l) or line.styleref.margin_l, margin_r = ((line.margin_r > 0) and line.margin_r) or line.styleref.margin_r, margin_t = ((line.margin_t > 0) and line.margin_t) or line.styleref.margin_t, margin_b = ((line.margin_b > 0) and line.margin_b) or line.styleref.margin_b, margin_v = ((line.margin_t > 0) and line.margin_t) or line.styleref.margin_t, syln = line.kara.n, li = line.i, lleft = math.floor(line.left+0.5), lcenter = math.floor(line.left + line.width/2 + 0.5), lright = math.floor(line.left + line.width + 0.5), lwidth = math.floor(line.width + 0.5), ltop = math.floor(line.top + 0.5), lmiddle = math.floor(line.middle + 0.5), lbottom = math.floor(line.bottom + 0.5), lheight = math.floor(line.height + 0.5), lx = math.floor(line.x+0.5), ly = math.floor(line.y+0.5) }
tenv.orgline = line tenv.line = nil tenv.syl = nil tenv.basesyl = nil初始化过程中,我们定义了:
layer:该行的层数,该值可能被tenv.relayer修改。lstart:该行的开始时间。lend:该行的结束时间。ldur:该行的持续时间。lmid:该行中间的时间,该值为计算时间。style、actor:样式、说话人信息。margin_l|r|t|b|v:该行的外边距。syln:该行的音节数量。li:该行的行号。lleft、lcenter、lright:该行距离__的距离,四舍五入取整数。lwidth:该行的宽度,四舍五入取整数。ltop、lmiddle、lbottom:该行距离__的距离,四舍五入取整数。lheight:该行的高度,四舍五入取整数。lx、ly:该行的x、y值,四舍五入取整数。
最后,设置了 tenv 的 orgline,清空了 tenv 的行(line)、音节(syl)和 basesyl 信息。
待应用模板
-- 应用所有模板行 aegisub.debug.out(5, "Running line templates\n") for t in matching_templates(templates.line, line, tenv) do完成了基本内联变量的配置,接下来就要应用模板了。在应用之前,我们需要知道我们要应用哪些模板。判断哪些模板需要应用的是 matching_templates。
matching_templates
-- 迭代器函数,返回所有要应用到给定行的模板function matching_templates(templates, line, tenv) local lastkey = nil local function test_next() local k, t = next(templates, lastkey) lastkey = k if not t then return nil elseif (t.style == line.style or not t.style) and (not t.fxgroup or (t.fxgroup and tenv.fxgroup[t.fxgroup] ~= false)) then return t else return test_next() end end return test_nextend可以看出,这里判断符合的条件是:
- 模板与行样式相同或模板无样式
- 模板无特效组或
tenv中模板特效组非false// FIXME
上述条件须同时满足。
自适应变量
if aegisub.progress.is_cancelled() then break end
-- 为 pre-line 设置变量 varctx["start"] = varctx.lstart varctx["end"] = varctx.lend varctx.dur = varctx.ldur varctx.kdur = math.floor(varctx.dur / 10) varctx.mid = varctx.lmid varctx.i = varctx.li varctx.left = varctx.lleft varctx.center = varctx.lcenter varctx.right = varctx.lright varctx.width = varctx.lwidth varctx.top = varctx.ltop varctx.middle = varctx.lmiddle varctx.bottom = varctx.lbottom varctx.height = varctx.lheight varctx.x = varctx.lx varctx.y = varctx.ly这里的自适应变量处在行模式,其代表的内容均为行内容。之所以称其为自适应变量,是因为在之后的处理中,它会随着处理模式的不同发生意义的改变,而这种改变对于使用者而言是自适应的。
这里,我们定义了:
start:即为该行的起始时间。end:即为该行的结束时间。dur:该行的持续时间。kdur:该行以厘秒为单位的时间,数值上为dur / 10。mid:该行的中间时间。i:该行的行号。left、center、right、top、middle、bottom:该行距离__的距离。width:该行的宽度。height:该行的高度。x、y:该行的x、y。
代码行
for j, maxj in template_loop(tenv, t.loops) do if t.code then aegisub.debug.out(5, "Code template, %s\n", t.code) tenv.line = line -- 尽管 run_code_template 也在循环内 -- 由于内层循环会改变 j 和 max_j -- 外层循环在 run_code_template 结束后也不会继续执行 -- 因此只会执行一次 run_code_template(t, tenv)执行代码行的代码。注意这里的代码只会执行一次,具体原因见注释。
set_ctx_syl
下一部分的处理会用到 set_ctx_syl,因此这里我们来看一下。
简单变量
function set_ctx_syl(varctx, line, syl) varctx.sstart = syl.start_time varctx.send = syl.end_time varctx.sdur = syl.duration varctx.skdur = syl.duration / 10 varctx.smid = syl.start_time + syl.duration / 2 varctx["start"] = varctx.sstart varctx["end"] = varctx.send varctx.dur = varctx.sdur varctx.kdur = varctx.skdur varctx.mid = varctx.smid varctx.si = syl.i varctx.i = varctx.si varctx.sleft = math.floor(line.left + syl.left+0.5) varctx.scenter = math.floor(line.left + syl.center+0.5) varctx.sright = math.floor(line.left + syl.right+0.5) varctx.swidth = math.floor(syl.width + 0.5)这里根据音节的属性,设置音节对应的内联变量,具体为:
sstart:音节开始时间。send:音节结束时间。sdur:音节持续时间。skdur:音节持续的厘秒数。smid:音节的中间时间。si:音节的序号sleft、scenter、sright:音节距离__的距离,四舍五入。swidth:音节的宽度,四舍五入。
其实,中间还混入了几个自适应变量:start、end、dur、kdur、mid、i。具体意义与行对应的相似,这里不再赘述。
注音/非注音的属性区别:竖直方向上的位置
if syl.isfuri then varctx.sbottom = varctx.ltop varctx.stop = math.floor(varctx.ltop - syl.height + 0.5) varctx.smiddle = math.floor(varctx.ltop - syl.height/2 + 0.5) else varctx.stop = varctx.ltop varctx.smiddle = varctx.lmiddle varctx.sbottom = varctx.lbottom end varctx.sheight = syl.height对于注音,我们将 sbottom 设置为该行的顶部;stop 根据 ltop 和 height 计算得出并四舍五入;同理计算出 smiddle。
对于非注音,我们正常设置为行的对应属性即可。最后,设置音节的 sheight。
水平对齐的属性区别
if line.halign == "left" then varctx.sx = math.floor(line.left + syl.left + 0.5) elseif line.halign == "center" then varctx.sx = math.floor(line.left + syl.center + 0.5) elseif line.halign == "right" then varctx.sx = math.floor(line.left + syl.right + 0.5) end根据行对齐方式的不同,计算该音节的 sx,即 x 坐标。其中的主要区别是加上的竖直,分别对应音节的 left、center 和 right 值,最后四舍五入。
垂直对齐的属性区别
if line.valign == "top" then varctx.sy = varctx.stop elseif line.valign == "middle" then varctx.sy = varctx.smiddle elseif line.valign == "bottom" then varctx.sy = varctx.sbottom end同理,处理 sy,也就是音节的 y 值,但这里不需要参与计算。
剩余的自适应变量
varctx.left = varctx.sleft varctx.center = varctx.scenter varctx.right = varctx.sright varctx.width = varctx.swidth varctx.top = varctx.stop varctx.middle = varctx.smiddle varctx.bottom = varctx.sbottom varctx.height = varctx.sheight varctx.x = varctx.sx varctx.y = varctx.syend现在,所有的属性都已经计算完成了,将对应的自适应变量覆盖即可。
模板行
初始化
else aegisub.debug.out(5, "Line template, pre = '%s', t = '%s'\n", t.pre, t.t) applied_templates = true local newline = table.copy(line) tenv.line = newline newline.layer = t.layer newline.text = ""如果待应用的是模板,此时拷贝当前行,并将 tenv.line 设置为拷贝后行。保留原 layer,清空文本。
pre-line
if t.pre ~= "" then newline.text = newline.text .. run_text_template(t.pre, tenv, varctx) end当存在 pre-line,即 t.pre 非空时,新行的文本附加上解析后的 pre 文本。
run_text_template
这个函数的作用就是纯粹的模板替换了。由于我们已经有了解析好的模板(template),准备好的代码执行环境(tenv)和定义好的内敛变量(varctx),这时候就是用上它们的时候了。
function run_text_template(template, tenv, varctx) local res = template aegisub.debug.out(5, "Running text template '%s'\n", res)简单的初始化,复制了一份 template 引用的拷贝到 res。
-- 替换内联变量 (this is probably faster than using a custom function, but doesn't provide error reporting) if varctx then aegisub.debug.out(5, "Has varctx, replacing variables\n") local function var_replacer(varname) varname = string.lower(varname) aegisub.debug.out(5, "Found variable named '%s', ", varname) if varctx[varname] ~= nil then aegisub.debug.out(5, "it exists, value is '%s'\n", varctx[varname]) return varctx[varname] else aegisub.debug.out(5, "doesn't exist\n") aegisub.debug.out(2, "Unknown variable name: %s\nIn karaoke template: %s\n\n", varname, template) return "$" .. varname end end res = string.gsub(res, "$([%a_]+)", var_replacer) aegisub.debug.out(5, "Done replacing variables, new template string is '%s'\n", res) end这里替换所有满足 \$([a-zA-Z_]+)(正则表达式)的字符串,并对其使用 var_replacer 函数。
var_replacer 函数接收一个参数,其就是匹配组的内容。在函数中,我们首先将其全部转化为小写,再到 varctx 中去尝试匹配。若匹配成功,则返回对应内容;否则就将原值返回,并且在前面补充上因为捕获而遗失的 $ 号。
-- 用以执行表达式的函数 local function expression_evaluator(expression) f, err = loadstring(string.format("return (%s)", expression)) if (err) ~= nil then aegisub.debug.out(2, "Error parsing expression: %s\nExpression producing error: %s\nTemplate with expression: %s\n\n", err, expression, template) return "!" .. expression .. "!" else setfenv(f, tenv) local res, val = pcall(f) if res then return val else aegisub.debug.out(2, "Runtime error in template expression: %s\nExpression producing error: %s\nTemplate with expression: %s\n\n", val, expression, template) return "!" .. expression .. "!" end end endexpression_evaluator 负责执行表达式并渲染其返回值。我们知道,表达式是以一对 ! 包裹的文本,我们将其加上 return 后作为代码执行的内容。这里要考虑两种情况:一种是表达式本身存在问题,另一种是表达式没有返回值。对于这两种情况,我们都不修改原文。对于正常可以执行且存在返回值的表达式,我们将替换成的文本设置为返回值。
-- 寻找并执行表达式 aegisub.debug.out(5, "Now evaluating expressions\n") res = string.gsub(res , "!(.-)!", expression_evaluator) aegisub.debug.out(5, "After evaluation: %s\nDone handling template\n\n", res)
return resend最后,执行并返回即可。
line
if t.t ~= "" then for i = 1, line.kara.n do local syl = line.kara[i] tenv.syl = syl tenv.basesyl = syl set_ctx_syl(varctx, line, syl) newline.text = newline.text .. run_text_template(t.t, tenv, varctx) if t.addtext then if t.keeptags then newline.text = newline.text .. syl.text else newline.text = newline.text .. syl.text_stripped end end end当模板行非空时,对该行的每一个 kara 循环。
在循环过程中,将 tenv 的音节设置为该 kara 对应的音节,设置音节的 varctx,并执行模板。
最后,如果 t.addtext(即没有设置 notext),则根据 keeptags 情况设置文本。
空模板行
else -- 该行无主模板,保持原文 if t.keeptags then newline.text = newline.text .. line.text else newline.text = newline.text .. line.text_stripped end end当模板行为空时,无法应用模板,故保持原文。
此时,如果模板设置中声明了 keeptags,则保留 tag,否则就删除 tag。
收尾
newline.effect = "fx" subs.append(newline) end end end aegisub.debug.out(5, "Done running line templates\n\n")最后,给生成行的特效栏标注为 fx,并附加到字幕文件最后。
apply_syllable_templates
function apply_syllable_templates(syl, line, templates, tenv, varctx, subs) local applied = 0
-- 循环匹配的所有模板 for t in matching_templates(templates, line, tenv) do if aegisub.progress.is_cancelled() then break end
tenv.syl = syl tenv.basesyl = syl set_ctx_syl(varctx, line, syl)
applied = applied + apply_one_syllable_template(syl, line, t, tenv, varctx, subs, false, false) end
return applied > 0end这个函数的功能是处理每音节的模板。对每一个匹配的模板,将其返回值附加到 applied,最后返回 applied,代表应用的模板数量。
在应用之前,我们需要将 tnv 中的音节设置为当前音节,并设置对应音节的内联变量。
最后,主要的调用是 apply_one_syllable_template,我们来看:
apply_one_syllable_template
初始化
function apply_one_syllable_template(syl, line, template, tenv, varctx, subs, skip_perchar, skip_multi) if aegisub.progress.is_cancelled() then return 0 end local t = template local applied = 0
aegisub.debug.out(5, "Applying template to one syllable with text: %s\n", syl.text)基本的初始化,可打断。这里初始化了 applied 是因为后面有递归。
检查:内联特效
-- 检查以确保内联特效正确 if t.fx and t.fx ~= syl.inline_fx then aegisub.debug.out(5, "Syllable has wrong inline-fx (wanted '%s', got '%s'), skipping.\n", t.fx, syl.inline_fx) return 0 end这里检查了模板的内联特效是否与该音节的内联特效一致,不一致则不执行。
检查:空音节
if t.noblank and is_syl_blank(syl) then aegisub.debug.out(5, "Syllable is blank, skipping.\n") return 0 end这里检查了模板是否跳过空音节以及音节是否为空。当上述二者均满足时,不执行音节模板替换。
处理:模板存在 char 修饰
-- 当需要时 递归每个字符 if not skip_perchar and t.perchar then aegisub.debug.out(5, "Doing per-character effects...\n") local charsyl = table.copy(syl) tenv.syl = charsyl
local left, width = syl.left, 0 for c in unicode.chars(syl.text_stripped) do charsyl.text = c charsyl.text_stripped = c charsyl.text_spacestripped = c charsyl.prespace, charsyl.postspace = "", "" -- for whatever anyone might use these for width = aegisub.text_extents(syl.style, c) charsyl.left = left charsyl.center = left + width/2 charsyl.right = left + width charsyl.prespacewidth, charsyl.postspacewidth = 0, 0 -- whatever... left = left + width set_ctx_syl(varctx, line, charsyl)
applied = applied + apply_one_syllable_template(charsyl, line, t, tenv, varctx, subs, true, false) end
return applied end对于 char 修饰,也就是上面判断条件中的第二个:perchar,此时要求我们以字符为单位进行模板应用,而不是音节。此时,我们针对每个字符进行处理。
首先,我们复制一份 syl 的副本,之后设置初始的 left 和 width 值。之后,对每个字符进行循环,将 charsyl 的内容替换为字符内容;将 prespace 和 postspace 置空; 通过调用 Aegisub 的 API 计算该字符的宽度并保存;设置对应的 left、center 和 right;更新 left;更新 varctx;最后递归调用 apply_one_syllable_template,将这个只有一个字符的音节作为单独的音节进行运算。
这里没有设置
tenv,如果有知道原因的大佬请在评论区指出,此处提前拜谢(
处理:模板存在 multi 修饰
-- 递归多重高亮音节 if not skip_multi and t.multi then aegisub.debug.out(5, "Doing multi-highlight effects...\n") local hlsyl = table.copy(syl) tenv.syl = hlsyl
for hl = 1, syl.highlights.n do local hldata = syl.highlights[hl] hlsyl.start_time = hldata.start_time hlsyl.end_time = hldata.end_time hlsyl.duration = hldata.duration set_ctx_syl(varctx, line, hlsyl)
applied = applied + apply_one_syllable_template(hlsyl, line, t, tenv, varctx, subs, true, true) end
return applied end对于 multi 修饰,与 char 类似,这里先偷个懒,之后有空再写(
常规处理:每音节代码行
-- 常规处理 if t.code then aegisub.debug.out(5, "Running code line\n") tenv.line = line run_code_template(t, tenv)对于代码行,常规的运行即可。
常规处理:每音节模板行
else aegisub.debug.out(5, "Running %d effect loops\n", t.loops) for j, maxj in template_loop(tenv, t.loops) do local newline = table.copy(line) newline.styleref = syl.style newline.style = syl.style.name newline.layer = t.layer tenv.line = newline newline.text = run_text_template(t.t, tenv, varctx) if t.keeptags then newline.text = newline.text .. syl.text elseif t.addtext then newline.text = newline.text .. syl.text_stripped end newline.effect = "fx" aegisub.debug.out(5, "Generated line with text: %s\n", newline.text) subs.append(newline) applied = applied + 1 end end
return appliedend最后,对于模板行,我们需要的就是简单的替换,使用的是之前定义的 run_text_template 函数。
在执行这个函数之前,我们需要生成一个新行,并复制当前音节对应的基本信息。
执行完 run_text_template 之后,我们再判断修饰语的问题。这里我们考虑的是 keeptags 和 notext。当 keeptags 时,我们将新行的文本附加上原文内容;当不存在 notext 时,我们将新行的文本附加上原文去除标签和绘画指令后的内容。
最后,我们将新行的特效栏设置为 fx,并将该行加入字幕文件中;将 applied 自加以表示应用的模板数增加了。
is_syl_blank
这个函数的主要功能是判断音节是否为空,配合 noblank 使用。
function is_syl_blank(syl) if syl.duration <= 0 then return true end
-- try to remove common spacing characters local t = syl.text_stripped if t:len() <= 0 then return true end t = t:gsub("[ \t\n\r]", "") -- regular ASCII space characters t = t:gsub(" ", "") -- fullwidth space return t:len() <= 0end当音节本身的持续时间就小于等于 0 时,自然是空的;否则,就要考虑文本内容是否为空了。先判断文本本身是否为空,在答案为否的情况下,我们尝试处理掉那些空字符再进行判断。这里处理掉的空字符有:
\t\n\r- 半角空格
- 全角空格
在将这些都删除之后再尝试判断,返回字符串长度 <= 0 的结果。
处理音节
-- 循环处理音节 for i = 0, line.kara.n do if aegisub.progress.is_cancelled() then break end local syl = line.kara[i]
aegisub.debug.out(5, "Applying templates to syllable: %s\n", syl.text) if apply_syllable_templates(syl, line, templates.syl, tenv, varctx, subs) then applied_templates = true end end对每一个音节,我们循环并调用 apply_syllable_templates。当存在应用的模板时,将 applied_templates 设置为 true。
处理注音
-- 循环处理注音 for i = 1, line.furi.n do if aegisub.progress.is_cancelled() then break end local furi = line.furi[i]
aegisub.debug.out(5, "Applying templates to furigana: %s\n", furi.text) if apply_syllable_templates(furi, line, templates.furi, tenv, varctx, subs) then applied_templates = true end end对每一个注音,和处理音节的步骤一致。
返回
return applied_templatesend最后,返回是否应用了模板。只要上述步骤中应用了任何一个模板,这里的返回值都是 true。
至此,整个过程结束。kara-templater 执行完毕。
结语
断断续续写了一个多星期吧,期间也是 Windows Manjaro 来回切换。经历了一个大 ddl,一个课设的开坑,还有一大堆的签到。整个写作过程中最大的麻烦居然是 Wordpress 太卡了,这是我万万没有想到的,比如写现在这一段的时候就有将近 10 秒的延迟,下次我再也不写这么长的单篇了(笑)。

2020 年 4 月 2 日更新:都是憨批 CodeMirror Blocks 的锅,现在丝滑流畅了,wdnmd
限于笔者 Lua 水平只是玩过 OpenComputers 的水平,本文可能存在大量的问题,希望读者们能够在评论中帮忙指出。
嘛,总之就是这样。下一篇可能会讲一下 create_ap,也是之前读完的,大概两三千行左右吧,开咕!(逃